Friday, July 25, 2014

It's...Calendar Time!!!

August is almost upon us and I'm busily finishing up curriculum choices and planning for the new school year.  Hayden will be starting Kindergarten work in a couple weeks, and Sophie will be starting a more structured pre-school program.  The excitement of starting anew with different subjects and themes, new materials and a freshly organized space puts a smile on my face.

I though some of you, especially those new to homeschooling wee ones, might like to hear how we start our day.  So here goes...


We don't have a set schedule for when our school day begins.  Most days we do our school work in the morning, but other days we don't start until after their mid-day nap.  However, to punctuate the fact that school work has begun and that they will be required to stay in the school room until we're finished (or until mom releases them), we have calendar time.  Calendar time is devoted to basic memory work, getting the wiggles out, and of course...discussing the calendar.


First, they snuggle into their little bean bag chairs in the reading nook and we say a prayer together.  Right now we're working on the sign of the cross and the Our Father.  After the prayer, we stand up and say the Pledge of Allegiance or sing the Star-Spangled Banner facing our little classroom flag.  Then, we head over to our calendar area.


I picked up a little 8-pocket vertical pocket chart in the dollar spot at Target that was just right for the days of the week.  We sing the Days of the Week Song to the tune of Alouette.


Sunday, Monday, Tuesday,
Wednesday, Thursday,
Friday, Saturday,
Then we start again.

The kids like to sing this at least 2-3 times pointing first to the days of the week on the pocket chart, and then to the days of the week on our calendar pocket chart.  I like this particular pocket chart because all of the cards are in English and Spanish.  
Then, I ask Hayden to identify which day of the week it is.  If he doesn't know right off the bat, I give him a clue like, "If yesterday was Thursday, then which day is today?"  That will almost always do it.  Our calendar has cards for yesterday, today and tomorrow, so the kids move those cards to the correct days and we count in English and Spanish from one to whichever day it is.  

Next, we talk about the weather.  The calendar has cards for the seasons, the temperature and the type of weather we're having, so we identify all three and replace any cards that need to be changed.  Then we move on to the months of the year.  I have each month written out on sentence strips that I picked up in the dollar spot at Target.  I point to each while we sing the Months of the Year song to the tune of 10 Little Indians.

January, February, March and April,
May, June, July and August, 
September, October, November, December.
These are the months of the year.

Then, we talk about the current month, last month, and the next month.  I ask them questions like, "What happens in December?" or "Which month do you go trick or treating."  Hayden likes to count down the months till Christmas...that boy is obsessed.  He's already planning out his Christmas wish list!

I've ordered a 1-100 pocket chart and a little place values pocket chart.  Once they arrive, they're going to be mounted to the wall in the calendar area, and we'll add them to our routine.  Our school year is going to consist of two 100-day segments, so we're going to add a number to the 1-100 pocket chart each school day and count from one to that number for extra counting practice.It will be a nice visual for me to see at a glance how far along we are in the school year.  

And finally, we move over slightly on the wall to the alphabet poster, numbers poster (1-20) and a map of the U.S. that I picked up at Dollar Tree.   For Sophie's benefit, I quiz her a little on letters and numbers.  She has a firm grasp on both, so we've moved on from naming the letters to telling me what sound they make...Hayden is quick to chime in if Sophie falters.  As part of his memory work, he is working on U.S. states and capitals right now and is enamored with our Melissa & Doug Deluxe Wooden USA Map Sound Puzzle, so the last thing we do during calendar time every day is quiz him on the ones he should know.

This all sounds like a lot, but it only takes 5-10 minutes...10 if they're really bouncing off the walls or asking a lot of questions.

How do you start off your school day?

Tuesday, July 22, 2014

But...why wouldn't you want them to go to public school?!

It was a perfectly enjoyable trip to Target.  My husband was home watching the kids, so I was able to take my time, browse through the dollar spot, which had some fabulous new junk (whoops, did I say that?)...uh merchandise that I just had to buy.  I could push my cart from isle to isle without having to ask anyone to keep their hands to themselves or explain why we couldn't buy every toy in what my son calls the "Toy Story" isle.  It was fabulous.

As the checker was ringing up my items, she noticed all of the bulletin board items I picked up in the dollar spot and asked if I was a teacher.  When I replied, that I home schooled my kiddos, her response caught me off guard.


"But...why wouldn't you want them to go to public school?!"  It wasn't polite chit chat...it was more accusatory, though I'm not really sure what she was accusing me of.  Right away, I felt like I needed to be on the defensive for some reason.  But I took a breath and gave her a few of my reasons.  Before I could get very far, she cut me off and asked, "But how are they going to meet new friends?!"

It took all I could muster, but I smiled and politely said, "How do your kids meet new friends?  I would imagine the same way.  We don't live in a bubble.  They just won't be attending public school.  They will take classes in various subjects with other kids and go to church.  They are involved in sports and other extracurricular activities.  They go on play dates, we have friends with kids their age, and they have friends in the neighborhood."


She didn't say anything else on the subject, just sighed defeatedly.  I wanted to pat her on the back and assure her that their physical and mental health would be just fine because she seemed to need that reassurance.


I have only been at this for a year, and as you know, my oldest child is just starting kindergarten this fall.  It's a lot of hard work, but I am enjoying every second of it, and the kids are too.  There have already been challenges, and I know there will be many challenges ahead...moments like these being among the toughest.  I'm thankful to have the support of friends and family and am strong in my conviction that this is the best path for our family at this time.


Has your experience been the same or different than mine?  Please comment below.  I'd love to hear about it.


Saturday, July 19, 2014

Sight Word Supplements To Bob Books Set 1, Books 1-4

If you read my earlier post this week on teaching your preschooler to read, you'll notice that I intentionally left out any mention of learning sight words.  Teaching my children to read, to me, means teaching them the mechanics and rules they need to pronounce words.

Memorization of sight words is just that...memory work.  Once you introduce a sight word to a child, all that is necessary for the child to learn to recognize that word upon sight, is repetition.  You can accomplish this in a variety of different ways.

You could buy a set of sight word flashcards or you could make your own with index cards.  I prefer to use colored index cards because when a learning tool is brightly colored, my kids think it's bound to be more fun.

You could add a weekly sight word to your morning circle time or calendar routine.  I write them on our easel chalkboard, and that's a stop in our little morning circuit.  During this time, I also like to review any that are causing Hayden trouble.  I may start a sight word wall so that they're always visible.

Any number of sight word worksheets can be found by searching Pinterest for 'sight word printables.'  You could dedicate an entire board to that one search string alone.  I've started creating sight word mazes and practice worksheets to supplement the Bob Books sets.  You can download them here, and make sure to check back often for new worksheets.

On the mazes, they can trace the path of the sight words with a crayon, marker, or pencil, or, if you want to give them a little extra fine motor practice, buy a package of sticky backed craft magnets and stick them on to pom poms or glass beads to mark the trail.  We went through a bunch of the homemade pom pom magnets before I realized that I had to buy better quality, firmer, fuller pom poms so the magnets had more of a surface to stick to.  You can also add a little touch of hot glue when you stick them on for a better hold.


When I really want to make it tough, I'll have him use his alligator tweezers to pick up the pom poms or the beads and place them in the right space on the maze.

If you have alphabet cookie cutters, they could cut the letters out from play dough to spell the word.  If not, they can just form the letters by hand.  Sight word play dough mats are on my to-do list, so check back in a few weeks.


Or...how about a game of sight word memory?  Just make a duplicate set of sight word flashcards, and you're all set.  I like to make one set from one color and one set from another color so the kids always know they have to pic one of each color in order to make a match.

 These are just a few suggestions.  The possibilities are endless.  As always, remember to have fun with it and enjoy the "ah ha" moments that are sure to follow.

Thursday, July 17, 2014

How To Teach Your Preschooler To Read

When our first child was born, I looked around the house dismayed that every inch of floor space was either stained concrete or tile.  I could envision nothing but bumps, bruises and goose eggs as he transitioned from crawler to walker to full-out running toddler.  So, I bought a set of 6 interlocking foam mats that covered about a 4' x 6' area in our living room for over $50...fine for an infant who wasn't walking yet, but it was apparent they wouldn't contain him for long.

Driving past a yard sale one day, I spied a humongous pile of foam mats.  Sure that they would be expensive, I stopped anyway and inquired about the price...$20.  $20 for what looked like at least 20 mats, a little dirty but in good condition otherwise.  SOLD!  I paid the woman, took my mats home and cleaned them up. 60 mats in total, enough to cover the entire living room and most of the main hallway in the house.  Awesome!

We still had the problem of what to do about the playroom.  Looking for something else completely on craigslist, I came across a woman who was selling 5 complete sets of 3/4 inch thick interlocking alphabet, number and shape mats for $80.  I snatched those up with a quickness.  They covered the floor completely in the 11' x 12' room that was the playroom.  Excuse the construction.  We were in the middle of replacing the baseboards.

So what does this have to do with teaching your preschooler to read, you're probably wondering right about now?

Hayden learned to crawl in that room on those mats.  We spent countless hours playing in there when he was a baby.  My husband and I would point to a letter or number and tell him what it was.  He wasn't talking yet, so he'd just look at us, smile and laugh...so happy with his new found independence.  After a few months or two, we started asking him to find letters and numbers for US.  He'd crawl over and point one out, and then because we had more than one set, he'd crawl to the other one and point to it.

Hayden started walking around a 13 months.  This new skill opened up all sorts of avenues for him...literally.  We still worked on letters and numbers every week but he had more important things to do than to show us where 'Z' was.

Around 18 months, I was very pregnant with our second child (read: big as a house), and tired all the time.  Poor Hayden was desperate for me to get down on the floor and play with him like I used to, so I came up with an alternative.  I started teaching him the sounds each of the letters make.  We'd focus on 5 or 6 a day reviewing them along the way.  Occasionally we'd use our LeapFrog Fridge Magnets to make it a little more fun.  We talked about the letter sounds wherever we went...in the car, at the grocery store, out for a walk, etc.

Then, Sophie was born, and I spent most of the time we had together trying to get him used to this new little person monopolizing Mommy's time...something he did not appreciate one bit.  We picked it back up after a few months though, and by 26 months, he had mastered his letter sounds.  So while Sophie was having her tummy time, I introduced a new game to Hayden.  I would point out an object in the room, have him tell me what it was called, and then ask him if he could tell me the beginning sound of the word.  "What sound does 'window' start with?"  "How about 'fan'?"  He picked up on this really fast and was soon asking me if random words started with a certain sound...and was most often right.

By 30 months, he was getting bored with this game and was ready to learn something new, so I purchased the first set in a series of phonics readers called Bob Books and started helping him to sound out the words.  We'd read one together each night before the rest of our bedtime books.  Here's a sample page from Set 1, Book 1.  Page one was simply "Mat."


Things were going well, but as we made it through more and more sets, and the difficulty level was increasing, I started to worry that I wasn't teaching him all of the things he needed to know.  I researched various reading programs and settled on The Ordinary Parent's Guide to Teaching Reading by Jessie Wise.  I don't use it as curriculum right now (though I could), but I do use it as a guide to know what to introduce next, making sure nothing is missed.  It's a very organized, thorough and systematic phonics program that takes you all the way from single letter sounds through completely independent reading.  It doesn't have any bells and whistles.  The pages are black and white and there are no illustrations, but you don't need any of that, especially if you use it as a teaching guide like I do rather than a workbook.


Each time I introduce a new sound, I write the letter combo on our little black board along with several words that utilize that combo.  We sound the first couple out together and then I have him sound out the rest on his own.  Then, I write out 2 or 3 sentences using the same words and have him read them to me. That's it...nothing fancy.  The rest comes from practice reading actual books.

We have story time in the morning, and no matter what the book of the day is, I have Hayden read the words I know he can read, and I read the rest.  Then, at night he reads one of the Bob Books to us as part of his bedtime routine.

As you know, each child is different and will go at their own pace.  Hayden turned 4 in June and can read books in the 4th set of the Bob Books on his own as well as sound out/spell consonant-vowel-consonant words.  Sophie, on the other hand, is 29 months and thinks every letters says "guh"...and that's OK with me.  She'll get there too eventually.

The point of all of this is that teaching your child to read, whether it's a toddler, a preschooler, or an older child, doesn't have to be a big production.  We didn't stress over any part of this process.  He would go through phases where he just wasn't interested in learning anything new or reading to us. When that happened, we just backed off for a while and took our cues from him.

You don't need a bunch of fancy worksheets, learning toys, videos or curriculum to get the job done.  Just some one on one time, a lot of praise, patience and a good selection of phonics readers.  

Have fun, and best of luck!

Wednesday, July 16, 2014

Top 10 preschool apps for the Kindle Fire

Both of our kids have had a Kindle Fire since they were two.  While I don't believe in letting a kid look at a screen and play games all day long, I do think a limited amount of time spent on educational apps is beneficial.  And...if timed correctly, it can give mom or dad time time without kids underfoot to get chores or other work completed, or just a little down time to relax.  We go on several long car trips throughout the year, and the kindles help make those long stints in the car a little easier for everyone.

There are so many apps out there to choose from, some paid, and some free.  We've downloaded and tried hundreds, some great, some fair, some not so much.  So, I thought I'd write up a quick little post to tell you what our top picks for preschool apps are.  These are apps that I approve of as a mom and apps that the kids go back to time and time again.

#1) Top of my list is Barnyard Games for Kids.  There is a free version and a paid version.  The free version allows you access to a few of the games.  You can unlock the rest after you've tried them or you can just download the free version right off the bat.  The full app includes shapes and colors recognition, upper and lowercase letter recognition and alphabet order, number recognition and counting, puzzles, and memory games.  The full version costs $1.99...money well spent in our house.

#2) Next up...Preschool and Kindergarten Learning Games.  This is made by the same people as Barnyard Games for Kids.  The games are a little more advanced including some from each of the categories Barnyard Games for Kids includes plus spelling, addition, subtraction, positions of objects, basic grammar and counting backwards.  I would put this on the must have list for advanced preschoolers and kindergarteners.  Again, there is a free version including a few of the games and a paid version.  The full version costs $1.99.

#3) Don't forget Count-A-Licious Free: Learn 123 Number Writing and Tracing Games with Counting Songs for Toddlers and Preschool Kids.  If I have to be driven crazy by the counting song, so do you.  My kids LOVE it and will play it in tandem on their kindles just to drive me batty.  But seriously, it's a great preschool math app.  The lessons are progressive, so the only way for them to repeat a completed lesson is for you to go into the menu and reset the game.  In the parent's only section, there are downloadable worksheets to compliment the app.  The free version has quite a bit included, but the full app is only $0.99.  You simply can't go wrong.

#4) Trains, Planes & Sea Vehicles - Puzzle for Toddlers.  This app is just what it says.  Both of our kids really like to put together these little puzzles.  The free app only has a couple puzzles included.  The full app costs $1.99.

#5) 123s ABCs Print Letters Kids Tracing Handwriting Fun ZBP.  There are three versions of this game.  One for Zaner-Bloser style letters, one for Handwriting Without Tears style letters and one for Manuscript style letters.  It's a fairly plain app, so I have been pleasantly surprised that both kids like to use it.  All three versions are FREE.  The only drawback for me is that a small add is displayed at the bottom of the screen.  The ad is not intrusive, but Sophie seems to always want to click on it.

#6) EduKidsRoom-Amazing Customizable Logic Learning Games for Toddlers & Preschool Kids to Teach Time, Organizing, Matching, Colors & More! is an absolute favorite in our house.  Instead of having a menu of games to pick from, the child must complete each game before moving on to the next, so there's no skipping over the challenging stuff which I love.  The games include sorting, matching, number recognition  digits, telling time, memory, patterning, and puzzles.  My favorite feature is the parent's menu.  You can set the skill level by device so my 2 year old can play easier versions of the game while my son plays harder versions.  You can also pick and choose which games appear for each child in case you want them to focus on a single or set of skills.  This app is free but it does contain periodic ads that you can remove for $0.99.  Love, love it!

#7) Moofy Recognizing Pattern Games.  This game includes ordering numbers and letters and 3 increasingly difficult levels of patterning.  There is a parent menu that lets you choose the set of skills your child will work on.  For example, you could set it to only include numbers 1-10 in the ordering section, or you could set it to include 1-100, or backwards from 20...you get the picture.  There is no free version of this app that I'm aware of.  At a $1.99, it's great practice for a child that is having trouble with recognizing patterns.

#8) Zoo Train.  My son loves this app.  He saw in a youtube review and had to have it.  It contains puzzles, songs, and very beginner spelling.  One of the games is a smokestack xylophone that plays one of four nursery rhymes.  Having played them so many times, he can now play them on our little xylophone...and is very proud about it I might add.  I personally like the train track puzzle.  It has greatly increased my daughter's spatial awareness.  There is no free version of this app.  It costs $0.99.

#9) Phonics Island: ABCs First Phonics and Letter Sounds School Adventure vol 1 Kids Ready to Read.  This is a great app for practicing letter sounds and early phonics.  It's a little slow moving for me, but the kids both love it.  There is a free version that includes a few letter sounds, but you have to unlock the full version to get access to all of the sounds.  The full version is $1.99.

#10) iStoryBooks is a great ebook app that contains a bunch of children's stories all in one.  We read to the kids all the time, but the kids like that they can hear stories we don't have in the voice of a different narrator whenever they like.  When they are playing independently, I will often play one or more of the books while they're playing for more exposure to the written word.  And the best part of all...it's completely FREE!  There are also separate apps for Christmas and History stories that have both free and paid versions.

There you have it.  In a few months, after we've flushed out a few more kindergarten apps, I'll have another top 10 list for you.

**As a disclaimer, this post contains affiliate links.**

Tuesday, July 15, 2014

Review of Lauri Tall-Stacker Pegs Building Set

I know this is a long time coming, but a promise is a promise...

When we started dedicated preschool at the beginning of the year, I purchased several different sets of manipulatives.  One of the first was the Lauri Tall-Stacker Pegs Building Set.

We have definitely gotten some mileage out of this set.  We used it for one-to-one counting, patterning, letter, number and shape formation, sorting, color recognition, building and other imaginative play.  One of the kids favorite things to do is see how tall they can stack the pegs before the tower falls over.

When I purchased this particular set, I didn't know that the thinner mats, in various shapes and sizes used for building, couldn't also be used solo on the ground for the other activities I mentioned above.  I don't know if you can tell from the picture at the top of the post or not, but they are very thin.  There isn't enough thickness to push a peg into the holes on the thin mats if they are laying on something solid.  Inevitably, when my son was playing with them or using them for an activity, his little sister would want to join in the fun and would get frustrated being relegated to the thinner mats because she couldn't figure out how to stick the pegs in the holes.

If I had known this, I would have purchased the Lauri Tall-Stacker Pegs & Pegboard Set as well.  I might have even opted to skip the building set and just buy two of the pegs and pegboard sets.

Overall, this set has exceeded our expectations.

Sunday, July 13, 2014

WOW! Where did the time go?

I cannot believe my last post was in February.  What a tremendously busy and fun year it has been so far.

Besides the wonderful learning journey we've been on (my husband and myself included), we also took a nice long vacation to Florida including 3 days at Disney World.  Fun, fun!!

Entrance to Magic Kingdom

We rowed the following fantastic books from the Before Five in A Row book list:

Goodnight Moon, by Margaret Wise Brown


The Little Rabbit, by Judy Dunn

and...

We're Going on a Bear Hunt, by Michael Rosen

We spent one month on each book.  When time permits, I'd like to do a post on each of the books so I can pass along all of the fantastic resources we used to cover them.

I had planned to take the summer off, but at the end of the first week Hayden asked me if we could do some school work.  Soooo, we dove back in finishing up June by covering all things 4th of July.  We started learning the states and their capitals.  We hung a small flag in our school room and started every day with the pledge and finished the day with the Star-Spangled Banner.  And...we read two books by Patricia A. Pingry titled, The Story of America's Birthday and The Story of "The Star-Spangled Banner".

I've been looking for a good United States puzzle for several months.  We have a couple.  One is a large floor puzzle and the other is a magnetic puzzle that I found at Hobby Lobby one day.  Neither one really fit the bill, so I started looking for a wooden puzzle and finally settled on the Melissa & Doug Deluxe Wooden USA Map Sound Puzzle.  It's a talking puzzle that tells you the names of the states and their capitals when you put the pieces in.  The two biggest problems I have with this puzzle are first, each state doesn't have it's own piece, and second, the cut out lines don't necessarily follow the boundaries of the states (some do fairly well).  The kids like it well enough, but they don't understand why one piece might have two states on it instead of one.

Right now, we're rowing the book Jesse Bear, What Will You Wear?, by Nancy Wright Carlstrom.  In a couple weeks, I'll have some fun stuff to show you...I promise!

Hayden progressed so far this year with reading and math that we've decided to start kindergarten this fall.  In preparation, I will be attending the Texas Home School Coalition conference in 2 weeks to finalize my choices for curriculum and listen to lectures on a wide range of topics.  Very exciting!  I've been filling every bit of spare time I have researching various curriculum for math, reading, and handwriting and gathering resources for bible, science, memory work, art and last but not least...how to organize it all.

Sophie will be working on mastering her letter sounds this fall and we'll continue to row several more books.

After everything has been finalized, I'll post about our choices.  Have you already had a child go through kindergarten or are you preparing, like I am, for kindergarten in the fall?  I'd love to hear what you used or are using and your experiences.

**As a disclaimer, there are affiliate links included in this post.**

Monday, February 3, 2014

Our first month in review part two: BFIAR The Snowy Day and All About Me


So, what in the world is BFIAR you might ask.  I describe it a guided reading program for young children.  Some might call it a preschool curriculum.  There is a long reading list to pick from.  You and your children spend 5 days (or more in our case) on the books you choose to row.  If you don't have the time or desire to come up with fitting activities yourself, you can buy the unit guide and find the reading list at http://fiveinarow.com/before-five-in-a-row/.  I have found so many appropriate activities through Pinterest for the books I've chosen to use that I haven't yet invested in the unit guides, though I might some time in the future.

As I mentioned in the previous post, we just finished a row of The Snowy Day  by Ezra Jack Keats.  To compliment that story, we learned about snow, ice, and polar animals.  Since we live in southeast Texas, days with temps below freezing are few and far between, and very rarely does it snow.  This year was no exception, so we improvised.

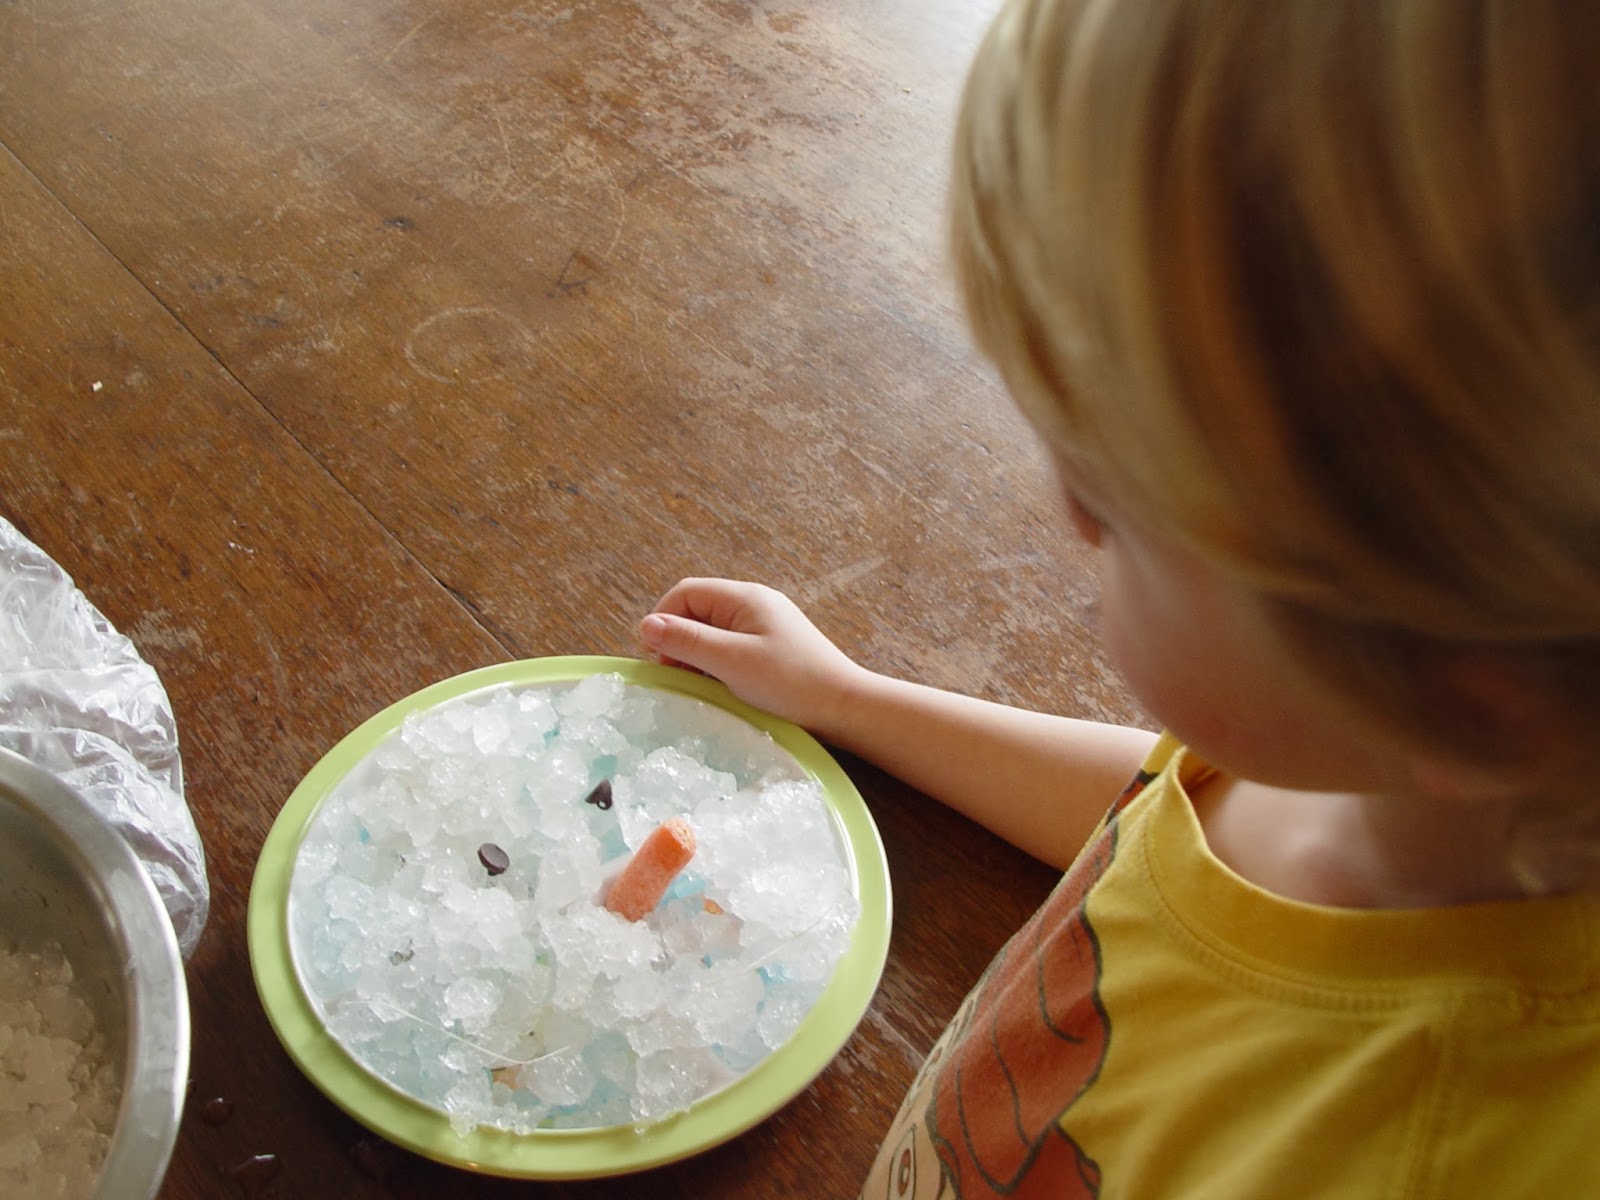
In the story, the little boy Peter makes a snowball and puts in in his pocket before coming inside.  Before bed, he checks on the snowball only to find a wet pocket.  I explained to Hayden that when water gets very, very cold, it freezes and forms ice or snow.  But when the weather warms up, the ice and snow melt back into water.  We demonstrated this by making snow faces out of crushed ice, chocolate chips, carrots, and string (we should have used red yarn, but for some reason, I prepared ecru crochet thread...probably because it was handy at the moment).


We put on of the snow faces in the freezer so it would stay very, very cold and we set the other out on the counter.  After a few hours, we checked on the two snow faces and this is what we found.  


He was amazed that the one on the counter had melted, but more than anything, just wanted permission to finally eat the chocolate chip eyes. :)

One of the days, we had a water and ice sensory bin.  I froze water in several different shaped containers as well as in a few lids.  Then filled a dish pan half way up with water.  We put the different sized ice cubes/sheets in the water and observed how part of the ice was above the water while part was below the water.  We got out our plastic polar animals, some from the Wild Republic Polar in Nature Tube  set and some from the Safari Ltd Arctic TOOB  set and talked about which animals spent most of their time on land or the ice vs. the water.  

We observed how cold the water was after adding ice, which led us to do the "blubber" experiment.  I filled a quart sized baggie half full of Crisco.  First we put our dry hands straight into the water and observed how cold it felt.  Then we put our other hand in the bag of Crisco making sure it was surrounded on all sides by Crisco and submerged it in the water.   Hayden said in amazement, "Mommy this hand isn't cold."  We talked about how marine mammals like whales, seals, and walruses have a thick layer of blubber under their skin to keep them warm in the cold waters.  Unfortunately, this was one of the many activities that I neglected to photograph.

I printed these polar animal flashcards on card stock and used them as part of my bulletin board display.  

Our second week in, we attempted sugar crystal snowflakes.  I made the snowflake out of cotton crochet thread and weighted it with a paperclip as opposed to making one out of a pipe cleaner because I thought the kids might want to try the rock candy when the experiment was over.  Turns out we should have made pipe cleaner snowflakes because neither one wanted to try them, and the thread just clumped up leaving us a blob of rock candy rather than a beautiful snowflake.  But it was cool, none the less, to watch it form over the course of a week.


This was super easy to do.  Just heat up a cup of water to just before simmering, and dissolve 2-3 cups of sugar.  You'll know when you've added enough sugar when the water becomes so saturated that the sugar will no longer dissolve and the water has become cloudy.  Remove the solution from the heat and poor it into a wide mouthed glass canning jar.  Suspend your snowflake from a pencil and lay the pencil across the top of the jar so that the snowflake hangs down inside the jar without touching the bottom.  If you're using string, you'll need to weight it down with a paper clip.  Be sure not to let the paper clip touch the bottom or crystals will form on the bottom of the jar making it very hard to remove the snowflake at the end of the week.  Then, just watch the crystals grow.

If you don't see any growth occurring after the first day, your solution wasn't saturated enough.  In that case, remove your snowflake and reheat the solution adding a bit more sugar and try again.

For our afternoon snack, a few days in a row, we made snow pretzel stick and marshmallow snowflakes and pretzel stick and marshmallow snowmen.  These were so cute, but alas, I again forgot to snap a pic.

Last but not least, we made a lap book using the printable story sequence cards from homeschool creations as well as the snowflakes from the same set of printables (for patterning).  For the front of the book, we "built" a snowman.  You can't see it in these pics, but under the red flap are two little pockets to hold the snowflake cards and the sequencing cards.  I attached sticky Velcro dots to both sets of cards and where I wanted Hayden to put them in the lapbook.  I didn't, however, pay close enough attention to whether the hooks or the loops were on the back of the cards, so if he didn't attach them in the same order I originally attached them, we had a problem...live and learn.


Stay tuned for part three.


**As a disclaimer, this post contains affiliate links.**

Our first month in review part one: BFIAR The Snowy Day and All About Me


Wow wee what a month!  I had planned to blog once a week to show y'all all the fun we had throughout the month, but as you can see that didn't happen.  It took me a while to find a balance between planning out the kid's "school work" each day and managing two businesses, Posh Patooties Luxury Baby Boutique and the Mommy Market.  I also kept forgetting to have the camera ready and available to snap pics of us in the moment, so I snapped some pics of the work they did after the fact.  Hopefully I'll be more on top of things this month.

We did have lots of fun though, and I was pleased with the progress both kids made and how eager they were to do their "school work" every day.

So as not to overwhelm you, I think I'll break this month up into several smaller posts instead of trying to cram it all in to one big long post.  Here we go!!

I never managed to get a picture of it, but I have a large cork bulletin board hanging on one wall in the school room.  I used borders to split it in half and devoted one side to each child and his or her learning objectives for the month.  Hayden's (age 3.5) side consisted of opposites, numbers 1-10, polar animals, L consonant blends and the 5 senses.  Sophie's (age 23 months) side consisted of the color white, the number 1, the letters A, B and C, and circles.

We started the month with a Before Five in a Row (BFIAR) study of The Snowy Day by Ezra Jack Keats so there were a lot of winter themed items on the bulletin board.


I printed out several copies of these numbered snowflakes to use on the bulletin board and for various activities.  In the pic shown below, I prepared one of Hayden's work boxes with a cookie sheet, the numbered snowflakes out of numeric order, and these Melissa & Doug Magnetic Wooden Numbers.  His task was to order the snowflakes from 1-10 and then find and place the correct magnet on each one.


Although he can count to 20, ordering is not something we worked on until this month, so it was challenging the first few times we did an activity like this. He picked up on it quickly though and Sophie got in on the fun.  She has a set of letters and the number she's working on permanently in one of her boxes which she pulls out daily.  BTW, I love, love my Trofast storage system and so do the kids.  I only wish I had room for more units.

I also love these little strip puzzles.  The one pictured was from 2teachingmommies.com. It was challenging for Hayden to remember that the numbers all had to go on the right hand side of the tray for the puzzle to come together correctly.


I made my own set of L consonant blend mittens to use on the bulletin board.  Feel free to print them out and use as you see fit.

We also used these mittens for memory matching, sorting, and counting.  Sorting by an attribute was quite possibly the most challenging thing for Hayden to grasp and we're still working on it.  If anyone has any suggestions, I'm all ears.

I am a big fan of these clothespin activities.  They are a fantastic way to incorporate learning objectives with fine motor development.  We did several throughout the month.  Holding the card with one hand while clipping the clothespin on the correct answer was just the right amount of challenge for Hayden.


I'm clearly not the master of taking non-blurry pictures. :)

I also introduced clothespins to Sophie with a different activity.  With a permanent marker, I wrote the upper case letters on 26 clothespins, then pinned them in order around the sides of a plastic storage bin with thin straight sides.  She doesn't quite have the coordination yet to remove or pin them back on (even with two hands), but she pulls the box out every few days and puzzles over it.  Sometimes she gets lucky and pulls one off by sheer brute force.

Hayden did quite a bit of patterning work this month...also not something he had really been introduced to before, but something he picked up on quickly.  Here you can see him using the Lauri Tall-Stacker Pegs Building Set .  I started the pattern off with the first 4-6 pegs and he completed the pattern in each row.  We also did the same activity with LEGO blocks and mittens mentioned above.  Next month I'm going to have him work on creating his own patterns.


These stacking pegs were a new manipulative for us.  The set I purchased has it's pluses and minuses.  I plan on reviewing them in another post very soon.

That's all I have time for right now, but I'll post parts two and three soon along with the review of the stacking pegs.  Have a wonderful week!


**As a disclaimer, this post contains affiliate links.**

Wednesday, January 1, 2014

My first homemade worksheet

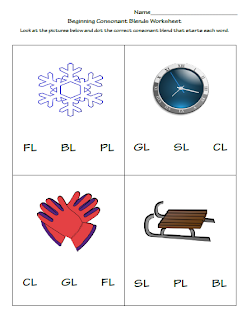
Well, the original intent of this little project was to create a winter-themed worksheet for the concept of beginning L consonant blends for my little reader.  But, for the life of me, I could not come up with appropriate words for CL, FL or PL.  So, I settled for clock, flake and plow (as in 'snow' for the latter two).

So...here it is, my very first homemade worksheet:


You are welcome to download it here.

I'm anxious to see how it goes over when we work through it next week.  Wish me luck!  I hope you all have a very safe, productive and happy New Year!